
- Go to the Student Notifications page. Switch the tab from “Custom-Bulk” to the “Trigger-Based” notification.
- Provide the appropriate Title to the notification. For example, “User Course inactivity”.
- Select the Trigger Event. There are 18 triggers available. Below is the list of available triggers. Choose one trigger as per your requirement.
- User hasn’t logged in for X days
- User hasn’t made progress in Course since X days*
- X days before a course expires
- X days after a course expires
- User enrolls in a course
- User enrolls in a group
- User completes all courses from the group*
- User completes a course
- User completes a lesson
- User completes a topic
- User completes a quiz
- User passes a quiz
- User fails a quiz
- User achieves a particular score in the quiz*
- An assignment is uploaded
- An assignment is approved
- An essay is submitted
- An essay is graded
For example, “User hasn’t made progress in Course since X days.”
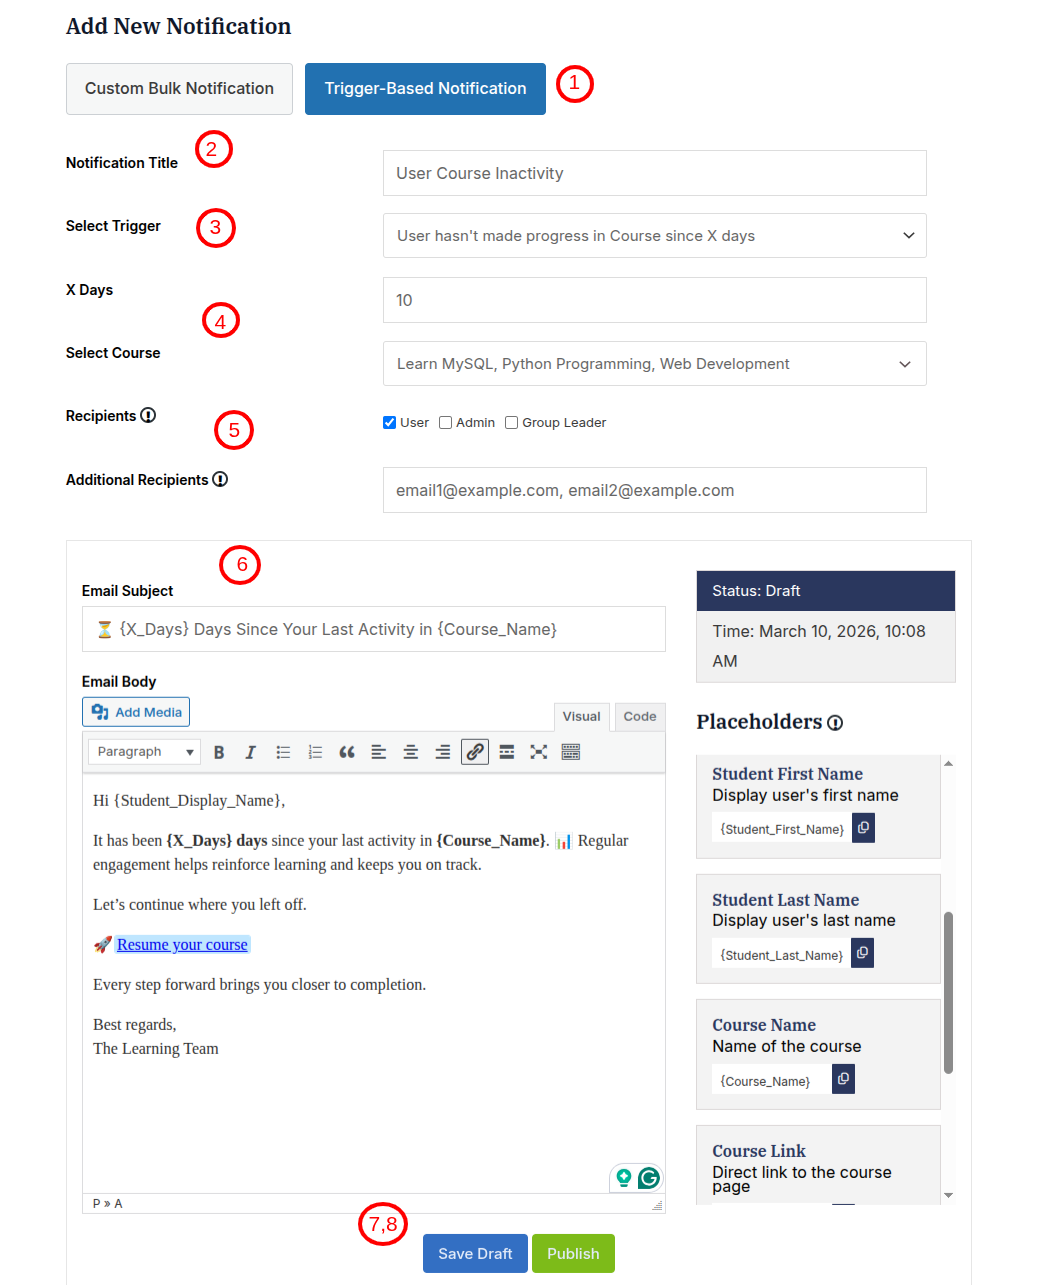
- Configure Trigger Conditions: As per the selected Trigger, you will see the dynamic fields to refine the notification.
For example, if you select the trigger “User hasn’t made progress in Course since X days”, you will get the following fields,
- X Days: How many days since the user has been inactive, and this notification will be sent.
- Select Courses: You can select multiple courses for which the notification will be checked and sent.
These are the other conditional fields as per the selected trigger:
- Select Group: This field allows you to select one or more groups. This field will be dynamically available for the following triggers: enroll_group, group_courses_completed
- Select Course- This field allows you to select one or more courses. This field will be dynamically available for the following triggers: course_expiry_before, course_expiry_after, enroll_course, complete_course, user_course_inactivity, assignment_uploaded, assignment_approved, complete_lesson, complete_topic, quiz_completed, quiz_passed, quiz_failed, quiz_custom_threshold
- Select Lesson:- This field allows you to select one or more lessons. This field will be dynamically available for the following triggers: complete_lesson, complete_topic
- Select Topic: This field allows you to select one or more topics. This field will be dynamically available for the following triggers: complete_topic
- Select Quiz: This field allows you to select one or more quizzes. This field will be dynamically available for the following triggers: quiz_completed, quiz_passed, quiz_failed, quiz_custom_threshold
- Quiz Threshold Field: This field allows you to enter a threshold value & select the quiz percentage/points, above/below the threshold. This field will be dynamically available for the following triggers: quiz_custom_threshold
- Select Assignments: This field allows you to select one or more quizzes. This field will be dynamically available for the following triggers: assignment_uploaded, assignment_approved
- Other necessary fields: These options further enhance the trigger notification.
- Recipients: This field determines who will receive the notification email when the trigger condition is met. There are three options you can choose from.
- User: The person who has performed the trigger.
- Admin: Administrators of the site.
- Group Leader: Group leaders of the user, if any.
- Additional Recipients: This field allows you to specify extra emails, separated by commas addresses that should also receive the notification. For example, example1@gmail.com, example2@gmail.com…
- Delay: This option allows you to delay the sending of the notification after the trigger condition is met. The delay can be configured based on time (for example, minutes, hours, or days). If the delay time is set to 0, then the notification will be sent immediately after the trigger occurs.
- Configure Email Content: When you select a trigger, a predefined email template with a subject and message body is automatically populated in the respective fields. This helps save time by providing a ready-to-use email format based on the selected trigger. You can easily modify the subject and message content to suit your specific requirements before activating the notification.
- Email Subject: This is the subject line for the email. You can add the placeholders in the email subject. For example, “⏳ {X_Days} Days Since Your Last Activity in {Course_Name}”.
- Email Body (WYSIWYG Editor): A rich text editor where you draft the full message. Supports formatting, links, and media. You can modify the email templates using dynamically available Placeholders as listed below,
- Course: {Course_ID}, {Course_Name}, {Course_Link}
- User: {Student_Username}, {Student_Email}, {Student_Display_Name}, {Student_First_Name}, {Student_Last_Name}
- Group: {Group_Name}, {Group_Link}
- Assignment: {Assignment_Name}, {Assignment_Link}, {Assignment_File_Name}, {Assignment_File_URL}, {Assignment_Result}
- Quiz: {Quiz_Name}, {Quiz_Link}, {Quiz_Percentage}, {Quiz_Result}, {Quiz_Score}, {Quiz_Total_Points}, {Quiz_Timespent}
- Lesson: {Lesson_Name}, {Lesson_Link}
- Topic: {Topic_Name}, {Topic_Link}
- X Days: {X_Days}
- Essay: {Essay_Name}, {Essay_Link}, {Essay_Points_Earned}, {Essay_Total_Points}
- Save or Activate the Notification: Once the notification is configured, you have options to save draft or publish the notification. Published Notification is activated, and the system will automatically monitor the trigger conditions and send emails when they occur.
- Update the Notification: Once a notification is created, it can be updated whenever needed. For notifications saved as Draft, all fields can be edited or modified. If the notification is already published, you can still update all other fields, such as email content, recipients, delay, and other settings; however, the selected trigger cannot be changed after the notification is published. This ensures the trigger logic remains consistent for the configured notification.